The next scene in your visual novel takes place at nighttime. You have a night version of your background ready and the scene is going well, yet you can’t help but find your characters to look way too bright in that
You figure out that a simple, dark blue overlay added with an image editor would do the trick and save you the gruesome process of recoloring everything by hand, but still, applying it to each sprite will not only be a pain in the
If you went through the same thought process as me, then you want the Ren’py engine to do most of the job for you via the im.Matrixcolor function!
The basics
image nox_neutral_dark = im.MatrixColor(
    "nox_neutral.png",
    im.matrix.tint(0.45, 0.45, 0.75)
    *im.matrix.brightness(-0.07))

# Calling the image in a scene:
show nox_neutral_darki with dissolve
nox "Shouldn't your be asleep?"
Let’s break it down:
- nox_neutral__dark is the name of the “image” you declare with Ren’py.
im .Matrixcolor (image, properties) basically means “I want to take this png file and apply these two properties (tint and brightness) to it.”- im.matrix.tint(0.45, 0.55, 0.75) means reducing the png file’s red and green tint to 45% and 55% respectively and keeping 75% of the blue tint. The color order is always “RGB” for Red, Green
and - im.matrix.brightness(-0.07) means lowering the png file’s initial brightness by 7%.
- An asterisk * is added before each new property or else the alterations won’t stack up.
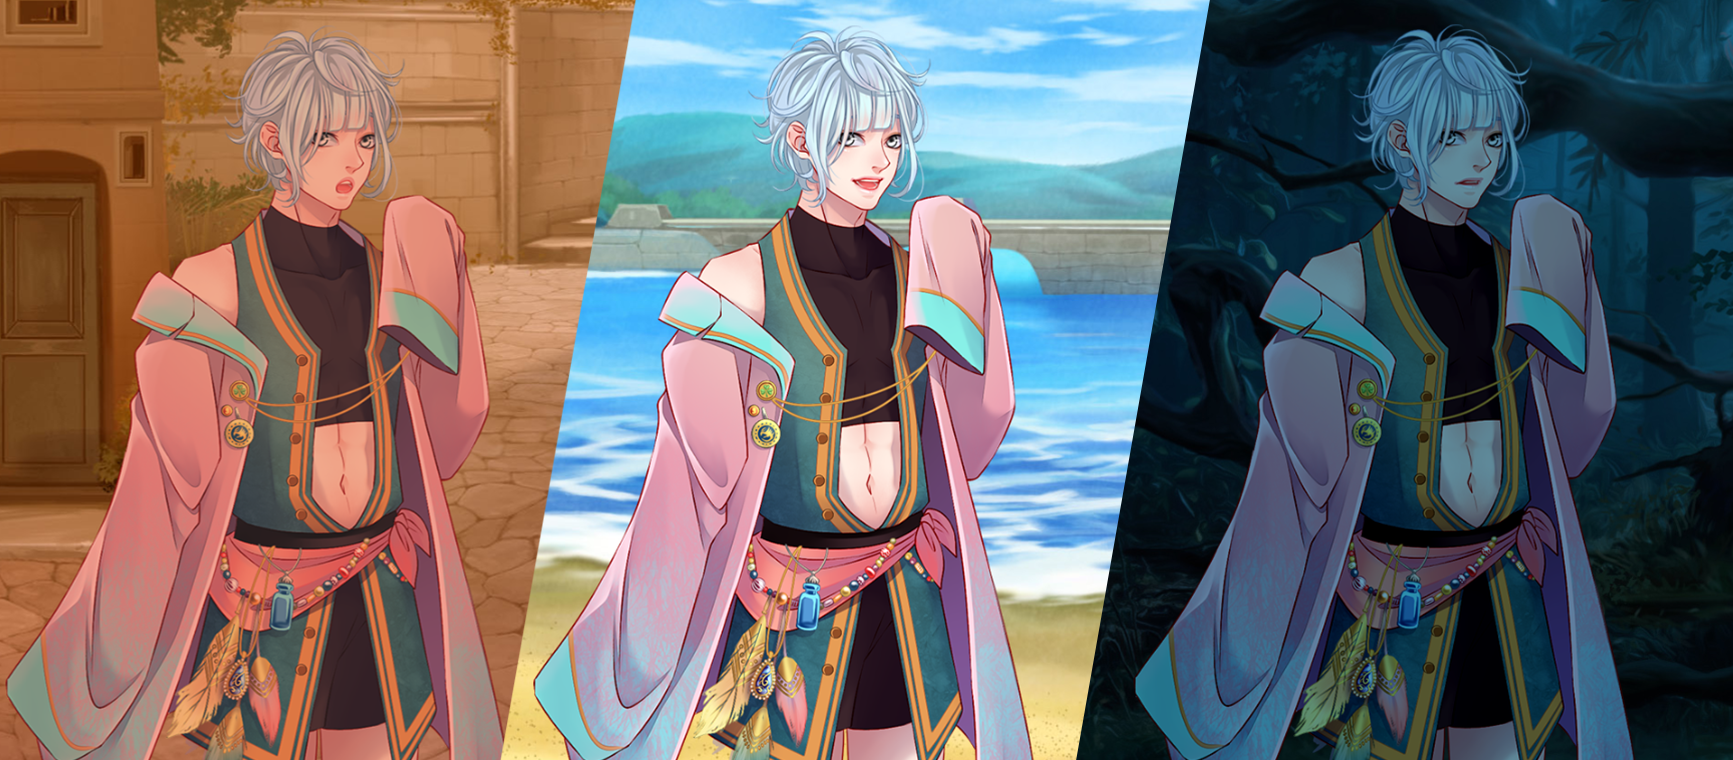
See the difference. Left is the normal sprites and right is the reshaded ones.


Feel free to change these numbers to whatever you want. For example, changing the tint
You probably want to declare every character in a separate file, for
The basics should be enough to cover most cases, but if you want to try out some more Matrix features, feel free to check our cheat sheets below. They’re free! =)
Combining im.Matrixcolor and Layeredimage
layeredimage nikos dark:
    always:
        im.MatrixColor("nikos_base.png", im.matrix.tint(.44,.44,.75)*im.matrix.brightness(-0.02))

    group face:
        attribute neutral:
                im.MatrixColor("nikos_expression_neutral.png", im.matrix.tint(.44,.44,.75)*im.matrix.brightness(-0.02))
        attribute laughing:
                im.MatrixColor("nikos_expression_laugh.png", im.matrix.tint(.44,.44,.75)*im.matrix.brightness(-0.02))
Characters sprites with darker skintones may react differently to the color alteration. In Raen and Nikos’ case, a slightly less dark tint (44% instead of 40%) worked better. It’s not a rule though, and Cyne, the Speaker and Illran, looked fine in our default dark tint despite their skin being tanner than Raen’s.
Cheat sheet: sunset shading

image leos emb sunset = im.MatrixColor("leos embarassed.png", im.matrix.tint(.85,.60,.45)*im.matrix.brightness(0.10))Cheat sheet: forest night shading

image raen neutral forestdark = im.MatrixColor("raen neutral.png", im.matrix.tint(.44,.65,.75)*im.matrix.brightness(-0.02))This one is similar to dark, except we kept more of the green (65%) tint to make the sprites fit the dark green foliage.
If you’re wondering about the leave shadows on top of the sprites, check our previous tutorial about im.alphamask. =)
Cheat sheet: “dim” shading

image lilas dim = im.MatrixColor("lilas smile.png", im.matrix.tint(.90,.90,1)*im.matrix.brightness(-0.1))Useful for a lit up room or street at night, or a dark alley during daytime.
Black and white silhouettes with im.matrix.brightness

image veras black = im.MatrixColor("veras_neutral.png", im.matrix.brightness(1))
image illran white = im.MatrixColor("illran_neutral.png", im.matrix.brightness(-1))
Inverted colors with im.matrix.invert


image bg archives invert = im.MatrixColor("images/BGs/bg archives.jpg", im.matrix.invert())
image ds sur inverted = im.MatrixColor("ds_surprised.png", im.matrix.invert())
Transparent sprites with im.opacity

image matron ang transp = im.MatrixColor("/images/sprites/others/matron angry.png",im.matrix.opacity(0.7))Combining im.Matrixcolor and im.Flip


image cyne flipped sunset = im.MatrixColor(im.Flip("/images/sprites/cyne/cyne_mischievious.png", horizontal=True), im.matrix.tint(.85,.60,.40)*im.matrix.brightness(0.10))In case you wanted to both reshade an image AND apply another transormation to it. Using the same method, you could also blur and darken a CG or background.
And that’s about what you can do with the
As for now, you can either play the original, 1-hour long demo of the game on itch.io, or check our extended, 4-hours-long beta by becoming a patron.
See you in our next making of! =)
Documentation: https://www.renpy.org/doc/html/displayables.html